
Are you a WordPress user looking for a way to protect your site from malicious users? If so, disabling directory browsing is a must. This blog post will show you how to do that in simple, easy-to-follow steps. So let’s get started!
Why it’s a good idea to disable directory browsing
Sensitive information that shouldn’t be accessible to prying eyes is stored in WordPress directories, like wp-content and wp-includes. As you are aware, your themes, plugins, and media uploads are located under the wp-content folder.
Table Of Contents
−- Why it’s a good idea to disable directory browsing
- How to disable directory browsing in WordPress
- Step 1: Log in to cPanel and Locate the File Manager
- Step 2: Find the public_html
- Step 3: Create a .htaccess File
- Step 4: Add the Options -Indexes Code
- Step 5: Save and Upload the .htaccess File
- Step 6: Check if the Settings are Applied
- Step 7: Disable Directory Browsing from the WordPress Dashboard
- Step 8: Check Your Website for Potential Vulnerabilities
- Step 9: Regularly Monitor Your Site for Security Breaches
- Step 10: Make Sure to Back Up Your Website
- Conclusion

Hackers can easily identify possible vulnerabilities by browsing through certain media files.
How to disable directory browsing in WordPress
The PHP server is used to operate WordPress. It consists of PHP, an OS (operating system), a database, and a web server.
The data on the website is kept in a database. Every website needs a data source.
The place where the files are kept is called a directory. The database has a directory for WordPress files. They will often be in a hierarchical file system for ease of navigation.
However, WordPress’s restriction on directory browsing is lifted owing to improper server settings. When that occurs, anyone can explore the website’s directory files.
Step 1: Log in to cPanel and Locate the File Manager
To start disabling directory indexing in WordPress, the first step is to log in to your cPanel account and locate the File Manager. It will allow you to access the directories and files present on your hosting server.
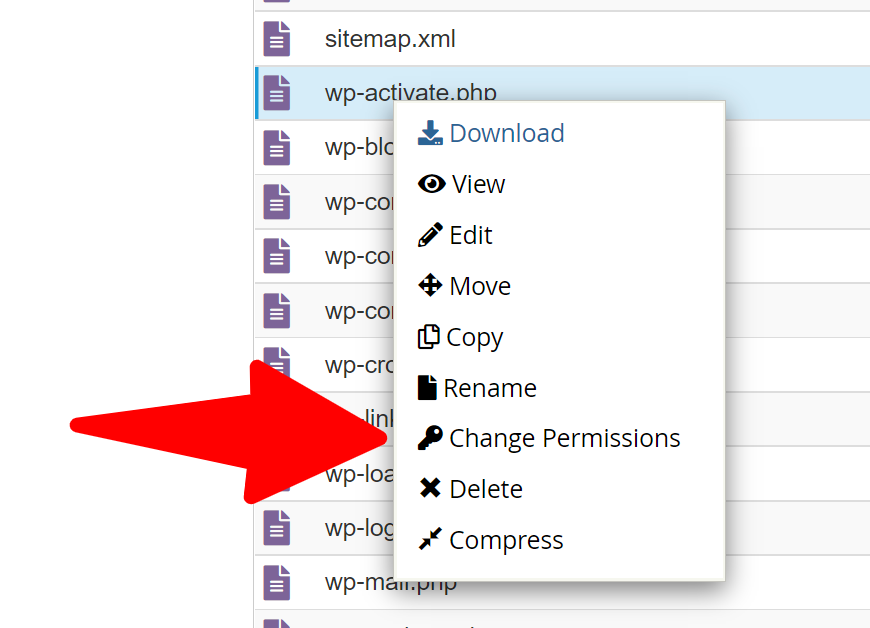
After logging in, navigate to the Advanced section and click the Indexes link or icon. This will display a list of available directories and files for you to work with. Right-click on the directory for which you want to disable directory browsing and select the option “Disable Indexing.”
After making this change, be sure to save the changes so that they take effect.
Step 2: Find the public_html
Once you log in to cPanel, you can access the File Manager. You can find the public_html folder that houses the files and folders of your WordPress website.
Navigate through the public_html folder and look for the directory that you want to disable directory browsing for.
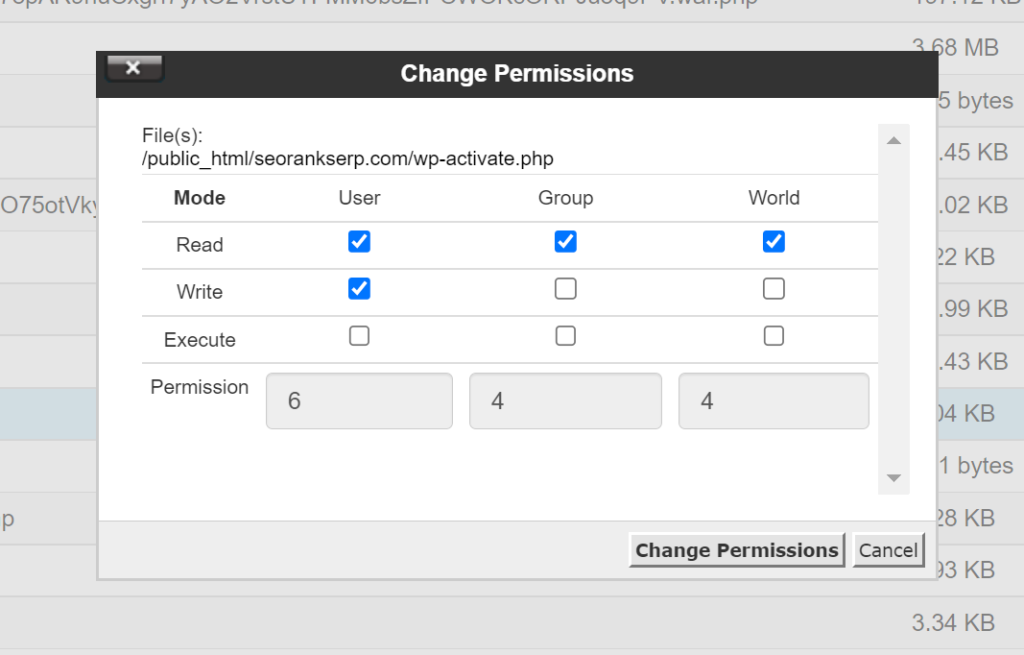
Assign file permission as 771, which means that the folder can not be accessed by visitors, only by its owners and groups. And click on Change Permissions.
Step 3: Create a .htaccess File
Once you have located the public_html folder, you must create a .htaccess file. This file is used to control how Apache serves files from your website.
To create the .htaccess file, right-click within the public_html folder and select Create New File. Name the file .htaccess, and then click Create. Now you can proceed to Step 4, which is to add the Options -Indexes code.
Step 4: Add the Options -Indexes Code
In the fourth step, you need to add the Options -Indexes code to the .htaccess file you have created. This code will block the directory browsing on your WordPress site.
This is the default .htaccess:
# BEGIN WordPress
<IfModule mod_rewrite.c>
RewriteEngine On
RewriteBase /
RewriteRule ^index.php$ – [L]
RewriteCond %{REQUEST_FILENAME} !-f
RewriteCond %{REQUEST_FILENAME} !-d
RewriteRule . /index.php [L]
</IfModule>
# END WordPress
And your final .htaccess will look like this:
# BEGIN WordPress
<IfModule mod_rewrite.c>
RewriteEngine On
RewriteBase /
RewriteRule ^index.php$ – [L]
RewriteCond %{REQUEST_FILENAME} !-f
RewriteCond %{REQUEST_FILENAME} !-d
RewriteRule . /index.php [L]
</IfModule>
# END WordPress
Options All -Indexes
Simply add the code at the end of the .htaccess file and save it. Once done, you must upload the file to your website’s root directory. This will ensure that your website is secure from potential security threats.
Step 5: Save and Upload the .htaccess File
Once you have added the code, save the .htaccess file on your computer. Then, upload it back to the WordPress root directory, replacing the old file. That’s it! Your directory browsing should now be disabled.
Step 6: Check if the Settings are Applied
Once you have uploaded the .htaccess file to your site, you can check if your settings have been applied. To do this, simply navigate to any directory on your site and try to open it. If you are no longer able to view the directory contents, then it means that directory browsing has been disabled.
Step 7: Disable Directory Browsing from the WordPress Dashboard
The next step to disabling directory browsing in WordPress is to do it from the WordPress dashboard. This additional layer of security can help ensure your site is secure. To do this, go to the ‘Settings’ section in the WordPress dashboard and click on ‘Permalink.’.
Then, scroll down to the ‘Optional’ section and uncheck the ‘Browseable directories’ option. Once you’ve done this, click ‘Save Changes,’ and the directory browsing will be disabled from the WordPress dashboard.
Step 8: Check Your Website for Potential Vulnerabilities
Once you have disabled directory browsing, ensuring your WordPress website is free from any potential security vulnerabilities is important. Check for outdated plugins or themes and make sure all your website’s components are up to date.
It’s also important to regularly monitor your site for any suspicious activity or malicious code. You can use tools like Google Search Console and Sucuri SiteCheck to detect potential security threats. If you find any security issues, address them quickly and effectively.
Step 9: Regularly Monitor Your Site for Security Breaches
Once you have disabled directory browsing from both the cPanel file manager and the WordPress dashboard, it is important to stay vigilant and regularly monitor your website for any potential security breaches. Keeping an eye on user activity and scanning your site for malware can help you identify any suspicious activity that malicious hackers could have caused.
Also, it is recommended to disable the PHP error reporting feature and migrate to HTTPS protocol to secure your WordPress site further. Following these steps will help protect your site from any malicious attacks.
Step 10: Make Sure to Back Up Your Website
Finally, it’s important to back up your website regularly. This way, if you ever encounter any issues with directory browsing, you’ll be able to restore your site quickly. Backing up your website is easy and can be done through various services.
Also, keep a copy of the .htaccess file safe if you need to access it again. Doing so will ensure that you have all the information required to troubleshoot any issues related to directory browsing.
Simply add the code at the end of the .htaccess file and save it. Once done, you must upload the file to your website’s root directory. This will ensure that your website is secure from potential security threats.
Conclusion
One of the security precautions that most web admins undervalue is disabling directory surfing. Most overlook this vulnerability, which makes the hacker’s job much simpler.
Any techniques mentioned above will stop WordPress from exploring directories because your files are crucial and should be kept private.

Jay
I've worked for WooRank, SEOptimer, and working on a cool SEO audit tool called SiteGuru.co. Now I have build Linkilo and SEO RANK SERP WordPress theme. I've been in the SEO industry for more than 5 years, learning from the ground up. I've worked on many startups, but also have my own affiliate sites.

TRY OUR FULLY SEO-OPTIMIZED WORDPRESS THEME FOR AFFILIATE MARKETERS!
No need to hire SEO experts anymore to fix your site technical SEO issues
IMPROVE YOUR SITES RANKING TODAY